Snack time babyyyyyyyy! I’ve been working on this hummus recipe for a while and finally it’s ready for all y’all. Make it once, and you’ll be convinced that there’s absolutely no reason to be buying hummus from the store any more. This recipe makes a MASSIVE amount of hummus (think more than the big jar of Sabra) for the price of a jar of tahini and two cans of chickpeas. The bonus here is that hummus can be frozen, so make the full batch and bring it to a party…or freeze half of it and have YumSizzle snack time whenever you want! (After thawing overnight, and optionally warming in a microwave)
You know what’s better than hummus with chips… hummus with fresh pita or flatbread. So, just because I’m feeling generous and I was STARVING for a reason to use that amazing everything bagel seasoning, you guys all get a double feature in this recipe. Not only are you getting the fluffiest, creamiest, easiest hummus recipe, but you’ll also be getting the ‘don’t freakout, it’s super easy’ everything bagel flatbread recipe.
Getting Started with Flatbread
Seriously, this bread is soooooo easy to make. Flour, water, salt, yeast, and a little bit of yogurt (yogurt is optional). There’s none of that pesky kneading, no waiting overnight, no hard steps to follow or weird shapes to create. The benefit here is that this dough recipe can be used to make focaccia and pizza too!
Disclaimer before the bread police come after me. There is no doubt that dough gets better with time. Millions of years of baking has proven that fermenting dough will produce a more flavorful product. If you have the time, and want to let this dough rest overnight in the fridge, (or for up to 72 hours) by all means go for it! You’ll end up with a more complex flavor and a little crispier final flatbread.
Today though, I’m hungry, and all I have is a couple hours to get this done. I also want to prove a point (or ‘proof’ a point….get it?!?!) that bread doesn’t need to be this complicated multi-step process. In fact, bread baking can be one of the easiest and most satisfying kitchen tasks with just a little bit of understanding of how bread baking breaks down to simple ratios.
The All Powerful Kitchen Scale
The most important tool in a bread bakers arsenal (other than a bench scraper, all hail the bench scraper) is a kitchen scale. With a kitchen scale the world of bread opens wide for any level of cook. With a scale we’re able to use bakers percentages, and armed with this little bit of knowledge you can easily impress your friends with a homemade pizza, or a fluffy focaccia, or a nice loaf of sandwich bread, or a crusty artisan boule. All of these breads are made with the same ingredients, just slightly different ratios of water and flour.
Basic Math
Bread operates in hydration percentages. You can certainly make this a more complicated conversation with sour dough and levains and all sorts of fancy flours…but you can also make it super simple. The bakers percentage is based on 100% flour. For instance, an artisan loaf of bread will be higher hydration, somewhere around 70%-75%, so if we start with 1,000g of flour, we would use 700-750g of water for that dough. Now, 1,000g of flour will give you two big loaves of bread. Most of us don’t need (or knead, I need to stop) two big loaves of bread, and that’s where the beauty of the bakers percentage comes into play.
We can start with any amount of flour, and know that we need a certain percentage of water to get our desired dough. Let’s consider this recipe which calls for 300g of flour. This dough is fairly high hydration at 70%, we can do that simple math and know that 300x.70=210, boom done. How easy is that?
But Dan….what about the amount of yeast? That seems like it’s going to be way harder to figure out. Well, maybe, if you’ve been reading complicated things and watching the wrong cooking shows, but let me tell you something awesome – the bakers percentages work for yeast and salt too! Yeast is 1% and salt is 1.5-2.2%.
The Bakers Percentage
To break that down, the basic bakers percentage works out to:
100% Flour
x% Water (based on amount of flour and desired hydration)
1.5% – 2.2% Salt
1% Yeast
Armed with this knowledge you can go out into the world confident that bread can be made. If you’re interested in this topic, I can’t recommend Ken Forkish’s book ‘Flour Water Salt Yeast’ enough. A lot of that book is based on hydration and sourdough baking, but the knowledge he imparts is generally easy to understand and will change how you think about baking.
Back To The Recipe
Anyway, I digress, we’re making easy quick flatbread here. It’s 70% hydration, there’s no kneading, and we add in a little bit of Greek yogurt to make the dough a little more supple. This recipe takes less than 5 minutes to put together, just mix together your dry ingredients (flour, salt yeast), incorporate the warm water, mix is all into a shaggy ball, then glob in a little greek yogurt and incorporate that (yes, it will be a sticky mess), and just cover that and let is sit for a couple of hours. It will seem lumpy and unmixed and you’re going to think it’s not going to work, but it will…I promise!
Hummus Time!
While that dough is rising lets get going on the hummus! This also takes about five minutes to put together. I developed this recipe because I was tired of people telling me to use dried chickpeas and soak them overnight to make hummus. I want a quick snack! I’m a growing boy! As you’ll see in the video the first thing I do is set the base of the hummus.
One clove of garlic, the juice from two lemons (more or less depending on your taste), 1 tablespoon of salt, 1 teaspoon of cumin, and one 16oz jar of tahini. Blend those together in a food processor (or high powered blender), and while they’re blending drizzle in about half a cup of ice cold water. After about a minute you should see a nice fluffy tahini mixture.
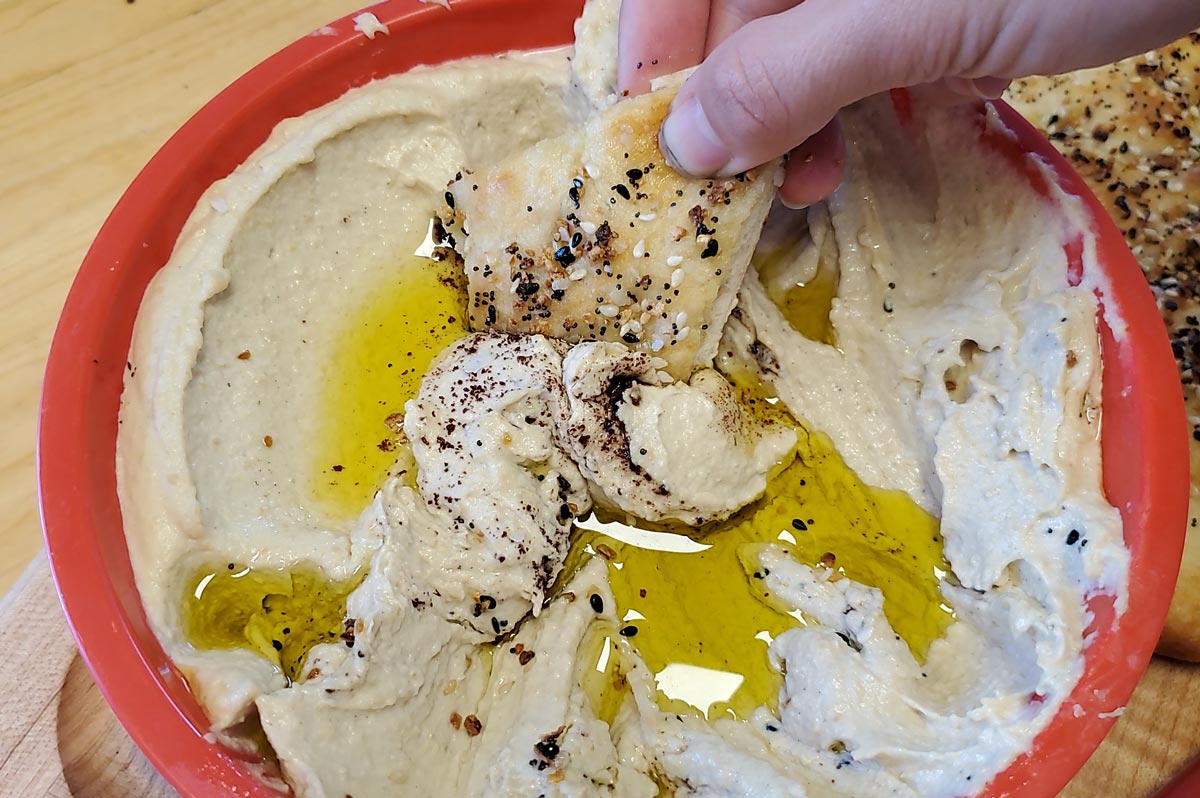
Into the tahini mixture pop in two cans of drained chickpeas. No need to take the skins off, just drain them and rinse them and pop ‘em in the tahini mixture. Process them for two minutes adding in the rest of your water, a cup to a cup and a half total. That’s it! This is a great base hummus and can be flavored in all sorts of ways but I like to keep it simple with extra virgin olive oil, and ground sumac. This is a real YumSizzle recipe, I implore you to make it, you won’t be disappointed.
Back To The Bread
After a couple of hours your dough should be about doubled in size. Flour your work surface (I use my cutting board, but often use cookie sheets since they’re rimmed and it makes cleaning up all that flour super easy) and dump the dough onto the surface. Flour the dough a little bit, then flatten it into a rough rectangle about and inch thick. Fold that rectangle onto itself in thirds, then fold it in half. Pinch the corners together on the top, then flip it over and use the stickiness of the dough and the tension created from your work surface to form a ball. Don’t worry if your ball isn’t perfect, it’s all good!
Rest It
Cover the dough ball with plastic wrap and let it rest for 25-30 minutes while your oven preheats to 515 degrees. If you have a pizza stone or steal stick that in and get it blazing hot, if not, stick one of your cookie sheets in the oven and get it hot.
Flatten It
After 30 minutes your dough ball will have risen a little bit. Flour the dough ball, and your work surface, and gently using your fingers, flatten out the dough so that it’s less than one centimeter thick. You’ll want this flattened dough to be roughly the shape of your cooking surface, I have a round pizza stone so I went round, if you’re using a cookie sheet go rectangle. Transfer your flattened dough onto a piece of parchment paper, this will make transfering it onto your hot baking surface much easier, if you have a pizza peel use it!
Season and Bake
Once the flattened dough is on the parchment paper drizzle and spread olive oil over the dough. Sprinkle it with any topping you like, I went for everything bagel seasoning here, but you can go for anything you want, rosemary, fancy salt, oregano, olives. When your dough is all dressed up you’re ready to bake. Place your dough (still on the parchment paper) onto your hot baking apparatus and bake for 10-15 minutes, you’ll see when it’s done. It will be nicely browned on top, and crisp and brown on the bottom.
And there you have it YumSizzlers. Easy delicious hummus and no nonsense flatbread. Enjoy!
5 Minute Hummus
Equipment
Ingredients
Instructions

Don't Freakout Flatbread
Ingredients
Instructions